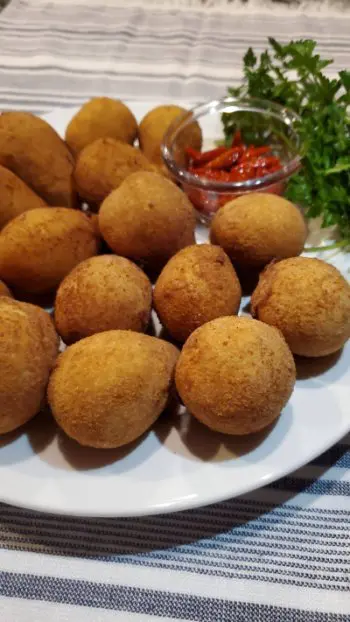
Brazilian Chicken Croquettes or Coxinha de Frango is a staple for Brazilian street food. My family is from the south of Brazil and they were a must at any social gathering or event. They are traditionally served along with other popular finger foods such as Quibe, Pastel, Risoles and Empadinhas. Of course there are so many other popular street foods in Brasil served alongside these delicious Coxinhas, but we’ll be here all day if I continue listing them!
Coxinhas are served as appetizers or you can eat them as a side with other traditional Brazilian dishes, such as rice, beans, and salad. They are loaded with shredded chicken, garlic, onions, parsley, rolled up into a cute little drumstick shape, then deep-fried. Coxinhas are very easy to hold making it an ideal finger food for events or to take on the go!
However you decide to eat them, rest assured that your taste buds will throw a party in your mouth!
This post contains affiliate links. As an Amazon associate, I earn from qualifying purchases.
We love serving these Coxinhas with different types of flavorful dipping sauces. Most of them are very easy to make and enhance the flavor of your Brazilian Chicken Croquettes.
Can you freeze Chicken Coxinhas and save for a later date?
The answer is YES! You can freeze raw Coxinhas for up to 90 days in an air-tight container (preferably covered in plastic wrap to preserve its’ shape) in the freezer. You may also store cooked Coxinhas for up to 3 days in your refrigerator inside of an air-tight container.
When you are ready to cook raw, frozen Coxinhas, just go ahead and remove them from your freezer and begin frying. There is no need to defrost, just add 1-2 additional minutes to your cooking time.
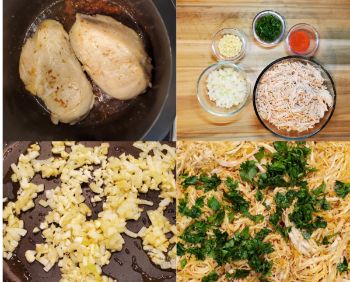
How to make the Chicken Coxinha Filling
- Season your chicken breasts well with garlic powder, salt and black pepper.
- In a pressure cooker, saute your seasoned chicken breasts for 5-7 minutes first. Then add your chicken bouillon cubes, and your water. Close the lid to begin pressurizing and cook for approximately 25-30 minutes (counting from the time pressure has been reached). Cooking times may vary due to the size and thickness of your chicken breasts.
- Once the chicken is cooked through, remove it from your pressure cooker and shred. The easiest and quickest way to shred chicken breasts is by using a hand mixer. You will not believe how much time this will save you!
- In a skillet over medium heat, add olive oil, chopped onion and minced garlic. Make sure to add the garlic once your onions are translucent so you don’t burn the garlic.
- Lower the heat and add in your cooked, shredded chicken, salt, black pepper, and colorifico (if you can’t find it at the store, you may use paprika powder). Combine all of your ingredients well by mixing them into your chicken. Remove your pan from the heat, add in your chopped parsley and combine it well into your filling.
- Your Coxinha filling is done, set it aside in a bowl while you work on making the dough. Save the chicken stock that’s in the pot for your next steps!
How to make the Chicken Coxinha Dough
- In a large pot, add chicken stock (it is best to use the chicken stock you have leftover from cooking your chicken breasts). Add in your butter, salt and colorifico (or paprika powder). Bring your mixture to a boil.
- Prepare your work surface and lightly sprinkle your counter with flour so you can knead the dough when it is ready.
- As soon as the water begins boiling, add in your flour in small amounts while stirring continuously. At this point, your dough will be very thick and it may be hard to stir but do your best to move it around inside the pan. You’ll know the dough is done when it begins peeling off of the bottom of the pan and isn’t sticky when you touch it with a dry finger.
- Once your dough is finished, remove it from the heat, flatten it onto your prepared countertop and allow it to cool down. Once it is cool to the touch, which shouldn’t take very long, begin kneading the dough with your hands for about 3-5 minutes or until you have a smooth texture.
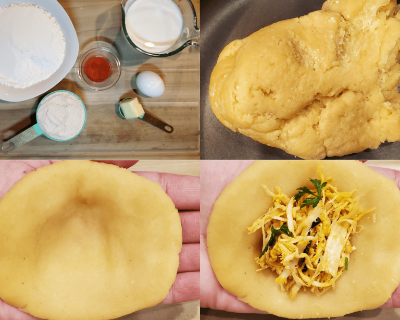
How to assemble the Chicken Coxinhas
- With your hand, grab a golf ball sized amount of dough and roll it into a ball.
- Using your thumbs, flatten the dough out into your hand, forming a flat circle. Make sure to hollow out the middle of the dough by pushing it into your hand with your thumb.
- Add approximately 1 tbsp of the filling to the center of the dough in your hand. Using your free hand, close the Coxinha by pulling the corners together and upwards. Begin shaping your Coxinha into a little drumstick or tear shape.
- Allow your assembled Coxinhas to rest on a plate, until you are done assembling and it is time to fry them.
- In a bowl, add your milk, egg, salt and mix well with a fork.
- Add your bread crumbs to a plate.
- Dip your Coxinha into the liquid mixture first and bread it immediately.
- Heat your oil up in a pot to 350 F. There should be enough oil to completely submerge your Coxinhas. Cook about 3-4 Coxinhas at a time, depending on the size of your pot. You don’t want to overcrowd the pot because that will lower your oil’s temperature. Fry them for approximately 4-5 minutes (turning them as needed) or until they have a nice golden brown color.
- Prepare a plate lined with paper towel to place the Coxinhas into when they’re done frying. The paper towel will help soak any excess oil.
And that’s it! You will absolutely love these Brazilian Chicken Croquettes. Serve them to friends and family, kids especially love these because they’re delicious and easy to hold! One more thing, there is no way you’ll be able to have just one! You can double or even triple this recipe for larger crowds! Believe me when I say that once you try them, you’ll want to make them again and again!

Top Tips & Variations for Making Brazilian Chicken Croquettes
If you don’t own a pressure cooker, don’t worry! You can cook your chicken in any other way that is convenient for you. Boil your chicken breasts in the water, just remember to cook them longer until they are fully cooked through. If you own an Instant Pot, that’ll work too! Additionally, I’ve seen people use a rotisserie chicken because it saves them time.
I used Colorifico in this recipe. Colorifico is a spice which is widely used in Brazil. Essentially, it is a mixture of annatto, ground corn meal and soybean oil. Annatto is made from the seeds of the achiote tree. The Colorifico can be purchased from Brazilian markets or online. If you do not have it in your area, paprika powder may be used as a substitute.
Many times, Coxinha is made with Catupiry. Catupiry is a creamy cheese which is similar to cream cheese. I did not add it into this recipe. However, feel free to modify to your liking!
Either way you serve them, these Coxinhas are definitely a special treat!
Brazilian Chicken Croquettes (Coxinha de Frango)
Ingredients
Coxinha Dough
- 2 cups flour
- 2 cups chicken stock
- 1 tbsp butter
- salt to taste
Coxinha Filling
- 2 shredded chicken breasts
- 1 onion
- 4 garlic cloves
- 1 tsp clorifico or paprika powder
- salt and black pepper to taste
Coating for Assembled Coxinha
- 2 cups milk
- 1 egg
- 1 cup finely ground breadcrumbs
- salt to taste
Instructions
How to make the Coxinha filling
- Season your chicken breasts well with garlic powder, salt and black pepper.
- In a pressure cooker, saute your seasoned chicken breasts for 5-7 minutes first. Then add your chicken bouillon cubes, and your water. Close the lid to begin pressurizing and cook for approximately 25-30 minutes (counting from the time pressure has been reached). Cooking times may vary due to the size and thickness of your chicken breasts.
- Once the chicken is cooked through, remove it from your pressure cooker and shred. The easiest and quickest way to shred chicken breasts is by using a hand mixer. You will not believe how much time this will save you!
- In a skillet over medium heat, add olive oil, chopped onion and minced garlic. Make sure to add the garlic once your onions are translucent so you don’t burn the garlic.
- Lower the heat and add in your cooked, shredded chicken, salt, black pepper, and colorifico (if you can’t find it at the store, you may use paprika powder). Combine all of your ingredients well by mixing them into your chicken. Remove your pan from the heat, add in your chopped parsley and combine it well into your filling.
- Your Coxinha filling is done, set it aside in a bowl while you work on making the dough. Save the chicken stock that’s in the pot for your next steps!
How to make the Coxinha Dough
- In a large pot, add chicken stock (it is best to use the chicken stock you have leftover from cooking your chicken breasts). Add in your butter, salt and colorifico (or paprika powder). Bring your mixture to a boil.
- Prepare your work surface and lightly sprinkle your counter with flour so you can knead the dough when it is ready.
- As soon as the water begins boiling, add in your flour in small amounts while stirring continuously. At this point, your dough will be very thick and it may be hard to stir but do your best to move it around inside the pan. You’ll know the dough is done when it begins peeling off of the bottom of the pan and isn’t sticky when you touch it with a dry finger.
- Once your dough is finished, remove it from the heat, flatten it onto your prepared countertop and allow it to cool down. Once it is cool to the touch, which shouldn’t take very long, begin kneading the dough with your hands for about 3-5 minutes or until you have a smooth texture.
How to assemble and fry the Coxinhas
- With your hand, grab a golf ball sized amount of dough and roll it into a ball. Using your thumbs, flatten the dough out into your hand, forming a flat circle. Make sure to hollow out the middle of the dough by pushing it into your hand with your thumb.
- Add approximately 1 tbsp of the filling to the center of the dough in your hand. Using your free hand, close the Coxinha by pulling the corners together and upwards. Begin shaping your Coxinha into a little drumstick or tear shape.
- Allow your assembled Coxinhas to rest on a plate, until you are done assembling and it is time to fry them.
- In a bowl, add your milk, egg, salt and mix well with a fork.
- Add your bread crumbs to a plate.
- Dip your Coxinha into the liquid mixture first and bread it immediately.
- Heat your oil up in a pot to 350 F. There should be enough oil to completely submerge your Coxinhas. Cook about 3-4 Coxinhas at a time, depending on the size of your pot. You don’t want to overcrowd the pot because that will lower your oil’s temperature. Fry them for approximately 4-5 minutes (turning them as needed) or until they have a nice golden brown color.
- Prepare a plate lined with paper towel to place the Coxinhas into when they’re done frying. The paper towel will help soak any excess oil.
This recipe was simply delicious we all loved it!!
Glad you enjoyed!